Terraform and AWS SNS and SQS and Lambda
Recently I worked with the AWS CDK to provision a certain amount of infrastructure for a project. I honestly had never worked with the CDK, so I decided to start like the newbie I was and dig into a tutorial recommended by a colleague.
The tutorial was great, easy to go through and very interesting. At the end you were left with a simple yet powerful infrastructure in AWS that consisted of an SNS Topic, an SQS queue with a subscription, and a Lambda function that consumed the SQS queue.
For anyone that knows me personally, you know that I am not a fanatic when it comes to programming languages or tools for the job, my philosophy is and has always been to try and use the best tools for the job. Be it Python or Node or Java or something completely different. But of course I do have my preferences, some make sense, other less so…
I personally like Terraform, I don’t think it a perfect tool, but I like it a lot. I wish there were more real life examples out there, even though the documentation is great more tutorial would be even better. This is why I decided to write this post. I thought that it would be really cool to see if I could reproduce the output from the AWS CDK tutorial, but just using Terraform.
The code which can be found on github.
Terraform
If you are already familiar with Terraform feel free to skip over to the next section. Terraform was created by HashiCorp and is a tool to help provision infrastructure as code. The great thing about Terraform is that it is not locked into one specific vendor, meaning that you can use it to provision AWS infrastructure, as well as Azure or even Digital Ocean and lots more.
Terraform consists of language constructs that allow you to address different platforms using Providers. Each provider specifies Resources and Data sources which allow you to provision your infrastructure.
Terraform comes with lots of built in providers as well and community maintained ones. For an in depth introduction to Terraform you should take a look at this post on Hackernoon
Installation
If you don’t have Terraform installed I suggest you take a look at the official installation documentation, which will guide you through the installation process based on the OS you are using. For those of you using a mac, you can simply use Homebrew.
So, after all the introductions lets finally see some code.
Provider
First of all we will just create the needed files in a new directory, and of course you are free to modify names and structure as you see fit.
$ mkdir terraform-sns-sqs
$ cd terraform-sns-sqs
Now lets create a file called providers.tf where we can specify that we are going use the AWS provider. Here we can set any variables needed for our provider.
# providers.tf
provider "aws" {
  version = "~> 2.0"

  region  = var.region
}
Lets define one variable to help us out. In my case since I use several AWS regions I prefer to specify the correct region name using a variable.
# variables.tf
variable "region" {
  description = "The name of the region"
}
Now lets set the value for our variable, which we can do in several ways. The one I prefer is to create a tfvars file. NOTE: the tfvars file should NOT be committed to git (or any other source control).
# vars.tfvars
region = "eu-central-1"
This part will allow us to communicate with AWS and provision our infrastructure. Please note that you will still need to have configured AWS correctly before you can run Terraform. You will need to follow this AWS guide if you haven’t done so already.
Resources
Now lets start creating our resources. Create a resources.tf file and lets start with our SNS topic.
# resources.tf
resource "aws_sns_topic" "results_updates" {
    name = "results-updates-topic"
}
Next lets add our SQS queue, and we can do that in the resources.tf file we created for the SNS topic. Please note that this is just for the purposes of this post.
Also, although most of the properties in the various resources below are self explicatory I will from time to time mention ones that are not so obvious. For example, notice redrive_policy, it is used to reference a Dead Letter Queue (DLQ) so that events that cannot be processed are not lost but are queued in our DLQ.
# resources.tf
resource "aws_sqs_queue" "results_updates_queue" {
    name = "results-updates-queue"
    redrive_policy  = "{\"deadLetterTargetArn\":\"${aws_sqs_queue.results_updates_dl_queue.arn}\",\"maxReceiveCount\":5}"
    visibility_timeout_seconds = 300

    tags = {
        Environment = "dev"
    }
}
This is our Dead Letter Queue, it’s just a simple SQS queue. Just like the one above.
# resources.tf
resource "aws_sqs_queue" "results_updates_dl_queue" {
    name = "results-updates-dl-queue"
}
Now we will need to create a subscription, which will allow our SQS queue to receive notifications from the SNS topic we created above.
# resources.tf
resource "aws_sns_topic_subscription" "results_updates_sqs_target" {
    topic_arn = "${aws_sns_topic.results_updates.arn}"
    protocol  = "sqs"
    endpoint  = "${aws_sqs_queue.results_updates_queue.arn}"
}
The final piece for the SNS and SQS infrastructure is the SQS policy that is needed for our SQS to actually receive events from the SNS topic. For the actual policy we can use the one that is specified by the Terraform documentation.
We will use this policy directly as it appear in the documentation. We will just update the names.
# resources.tf
resource "aws_sqs_queue_policy" "results_updates_queue_policy" {
    queue_url = "${aws_sqs_queue.results_updates_queue.id}"

    policy = <<POLICY
{
  "Version": "2012-10-17",
  "Id": "sqspolicy",
  "Statement": [
    {
      "Sid": "First",
      "Effect": "Allow",
      "Principal": "*",
      "Action": "sqs:SendMessage",
      "Resource": "${aws_sqs_queue.results_updates_queue.arn}",
      "Condition": {
        "ArnEquals": {
          "aws:SourceArn": "${aws_sns_topic.results_updates.arn}"
        }
      }
    }
  ]
}
POLICY
}
At this point we have everything which is in the original CDK tutorial I worked through. Now you could easily run Terraform and provision your infrastructure. So lets do so.
Run Terraform
When you run Terraform you will need to go through the following commands.
Initialize
First lets initialize Terraform using the init command. The command is used to initialize your working directory containing the configuration files. You should run this command the first time you create a new Terraform configuration or when you make substantial changes and include new providers. The command is safe to run multiple times.
$ terraform init
Plan
Second lets see if everything is working as planned in Terraform. We do so by running the plan command, which is used to create the execution plan. We added our variables in the tfvars file so we will have to inform Terraform to use it via the -var-file flag.
$ terraform plan -var-file="vars.tfvars"
Apply
Finally, we will be able to deploy our plan by using the apply command, which is done like so (don’t forget the var file)
$ terraform apply -var-file="vars.tfvars"
AWS
At this point, if you followed all the steps above and ran Terraform, you will have a new SNS topic and an SQS queue subscribed to the SNS topic. If we log in to our AWS console and select Simple Notification Service from the Services menu we will be presented with the Topics Dashboard.
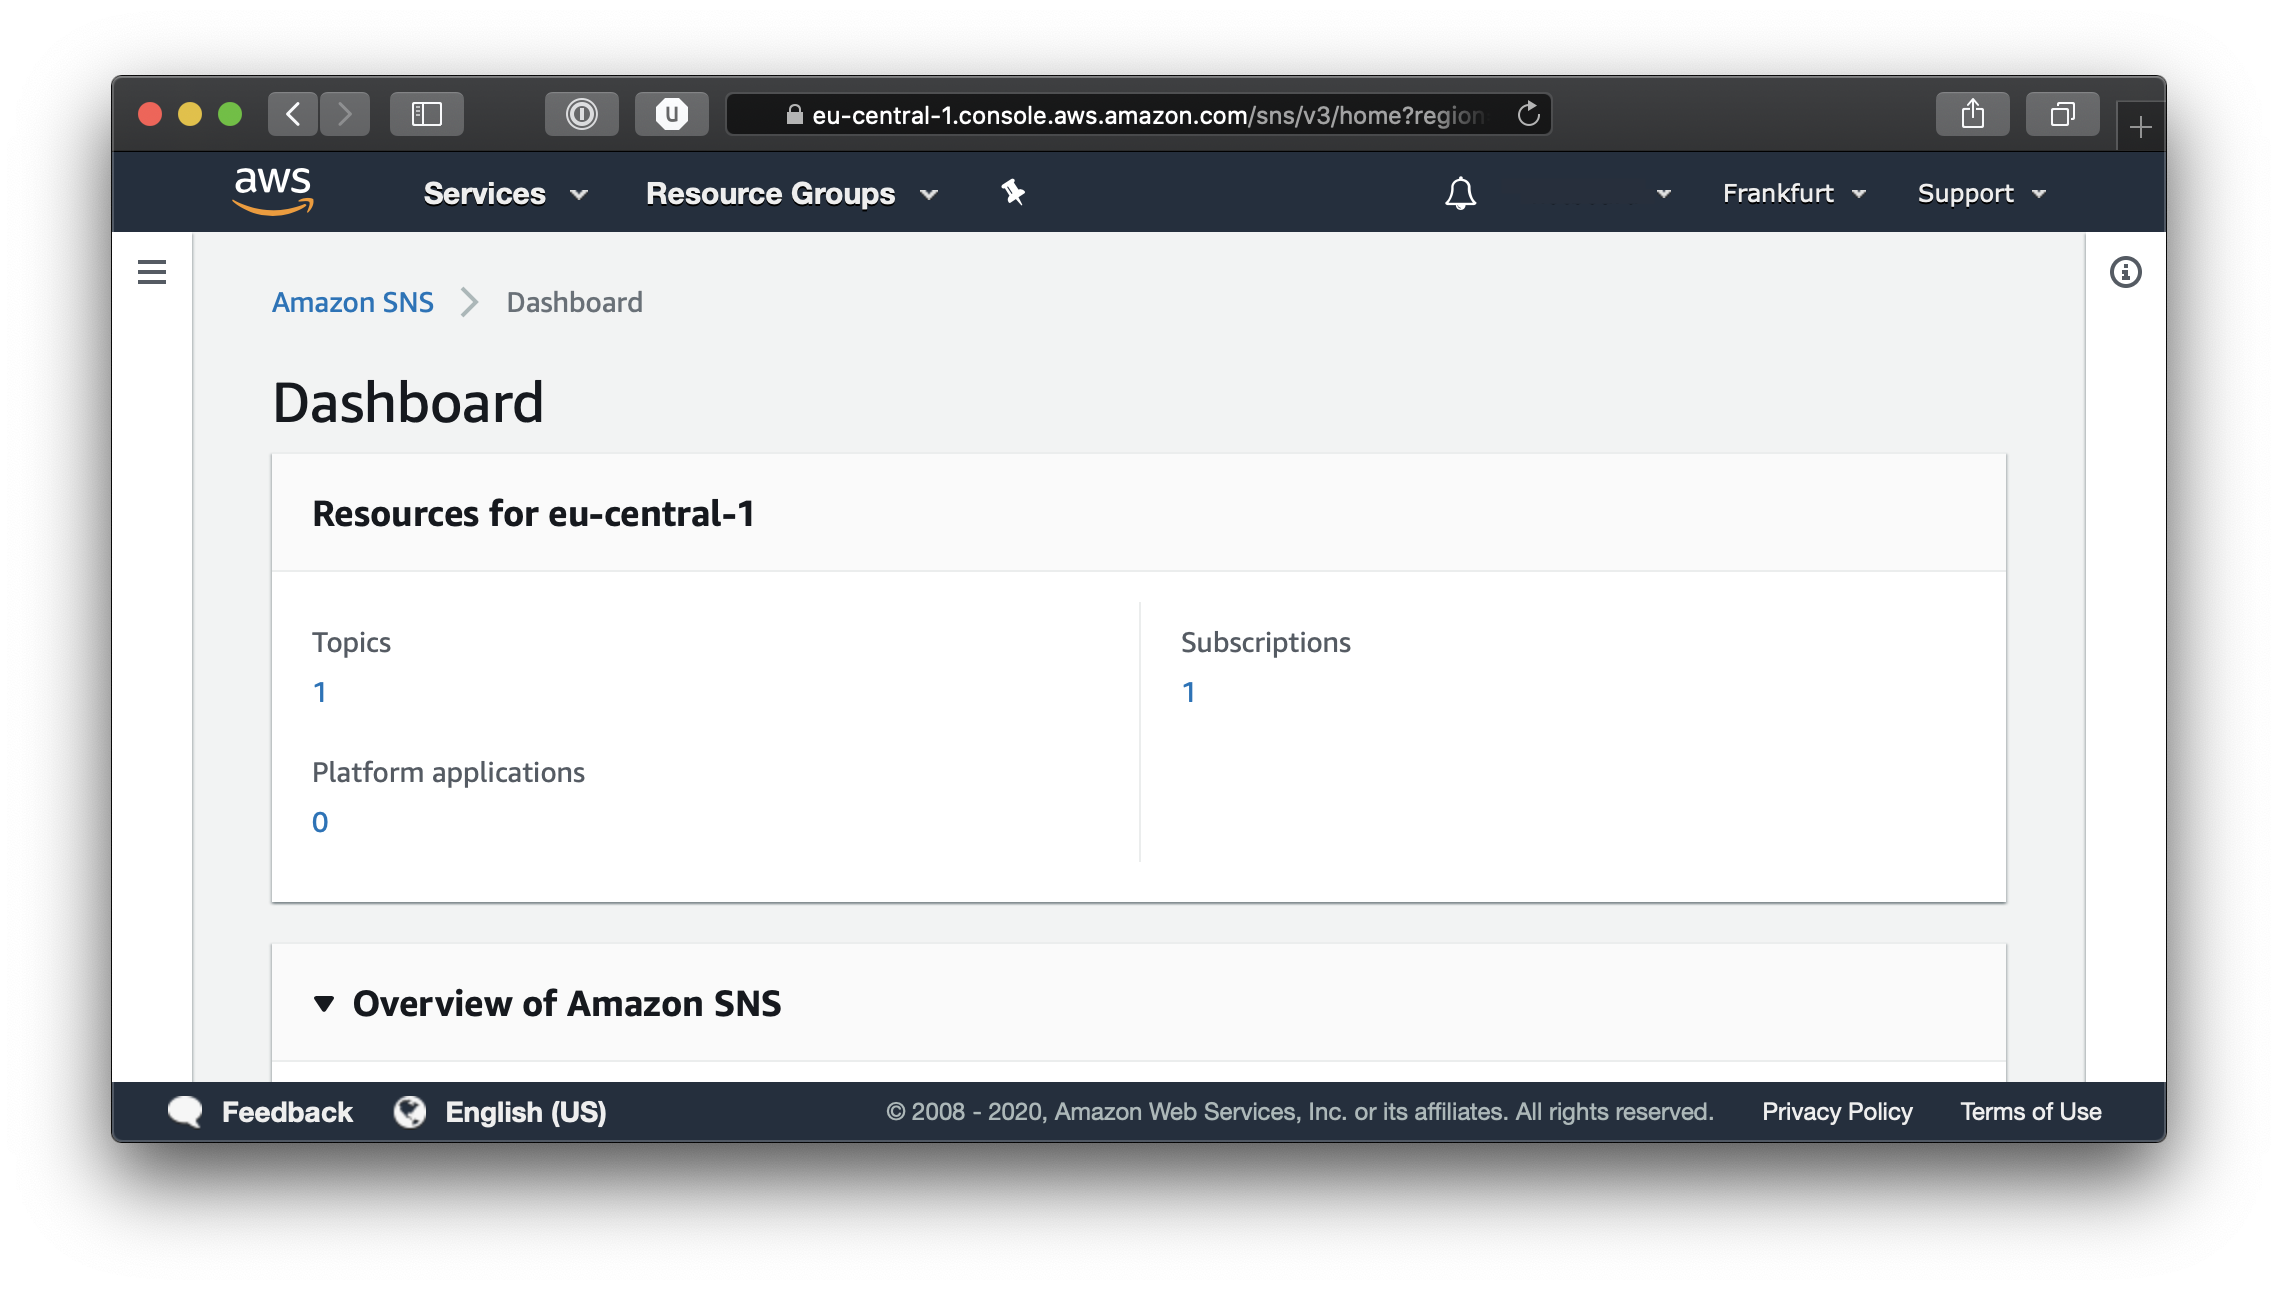
From the Dashboard if you click on the number under Topics, you will be taken to the Topic list page.
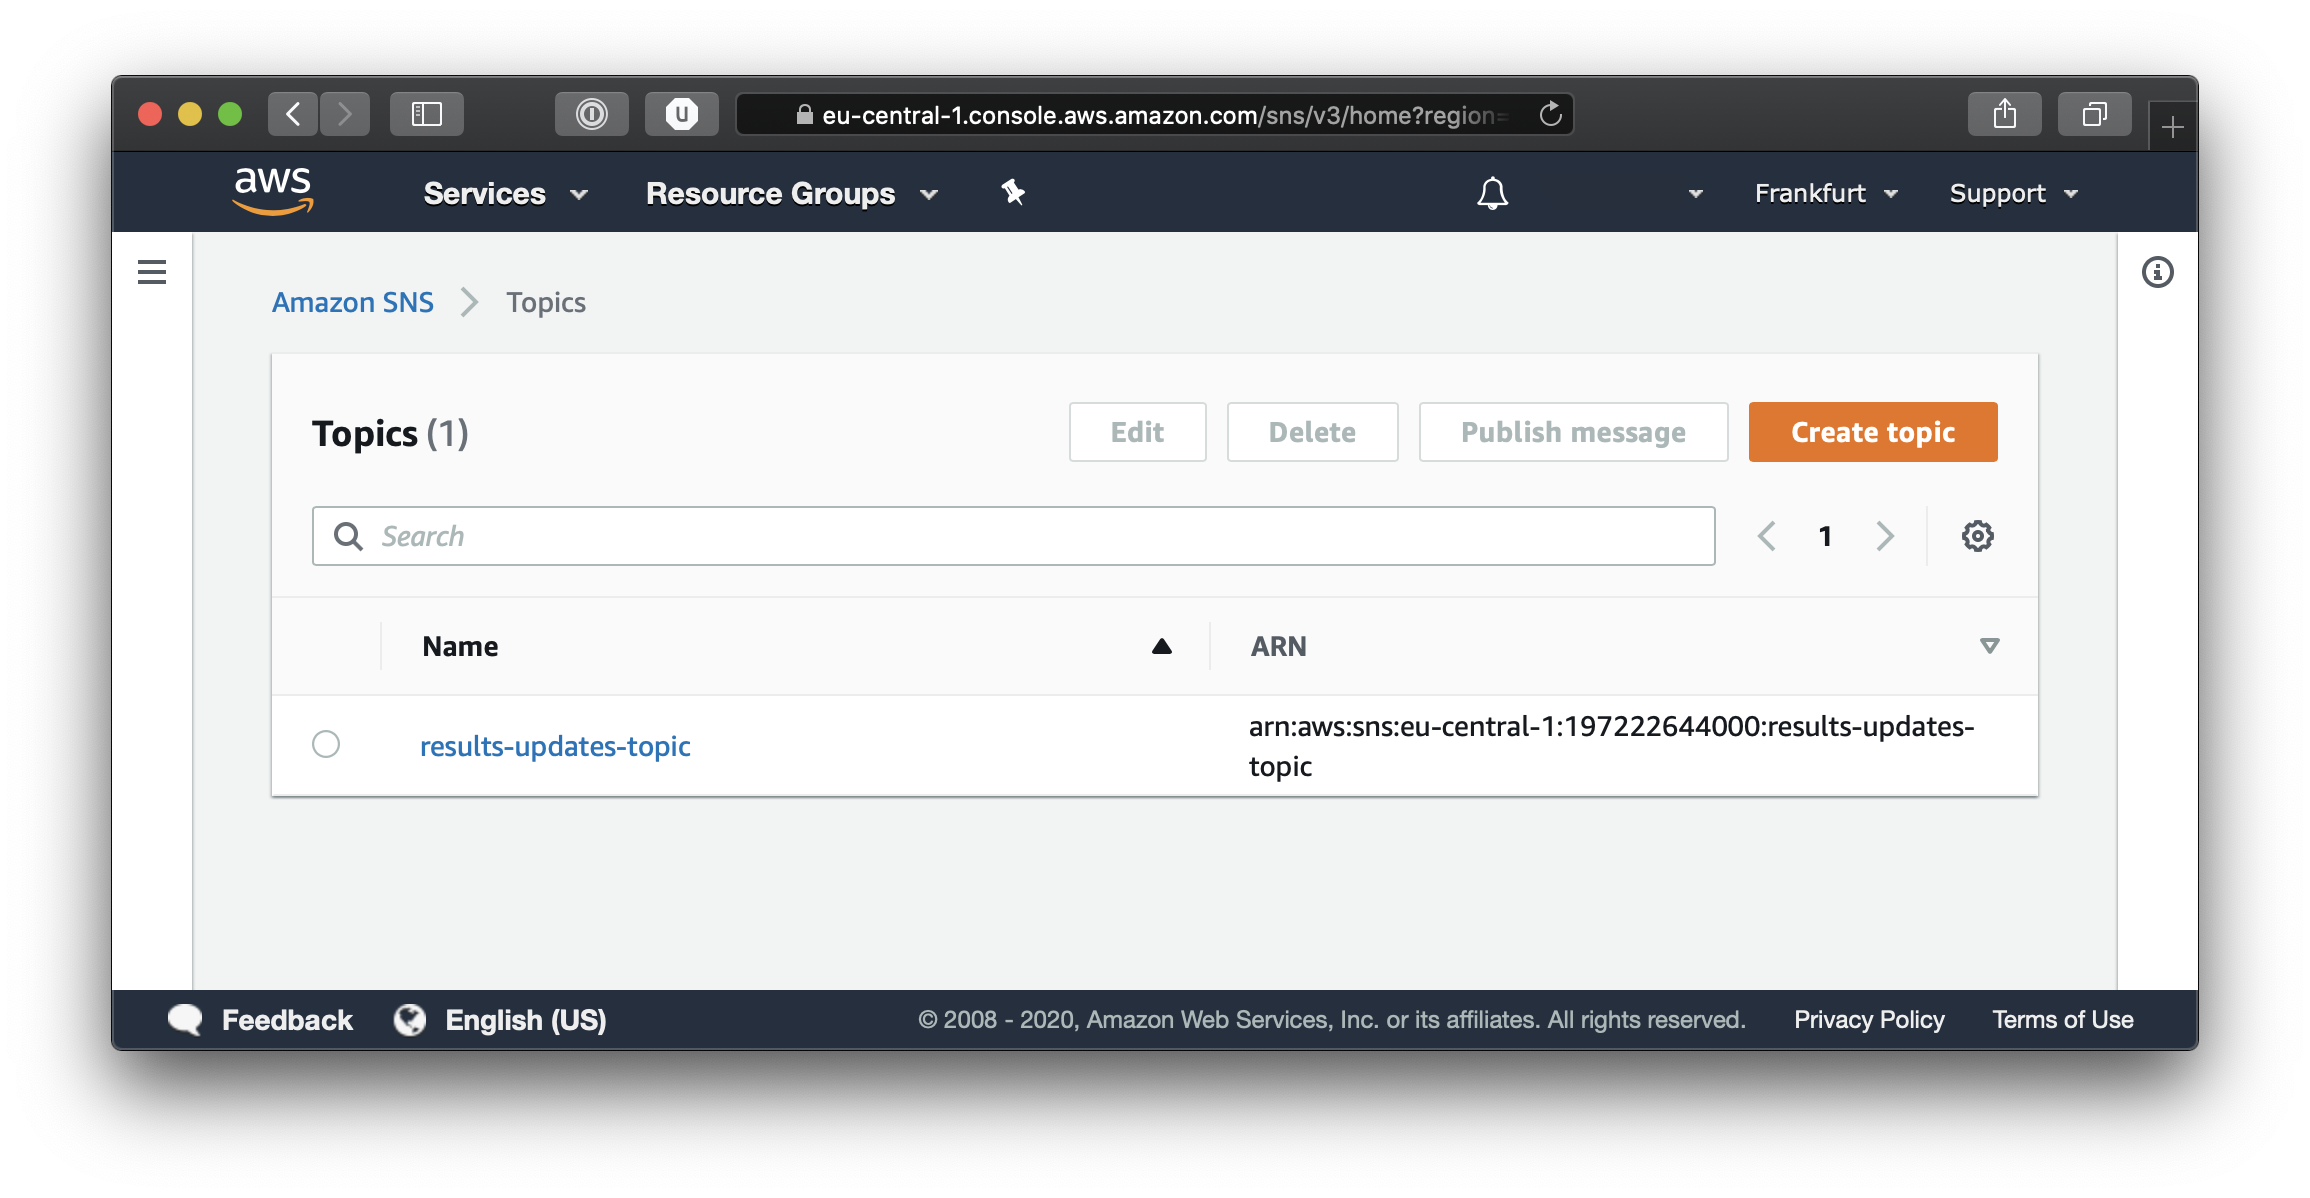
If you click on the Topic you just created you will be able to see its details, including the Subscription details. And as you can see from the screenshot below, the subscription points to an SQS queue.
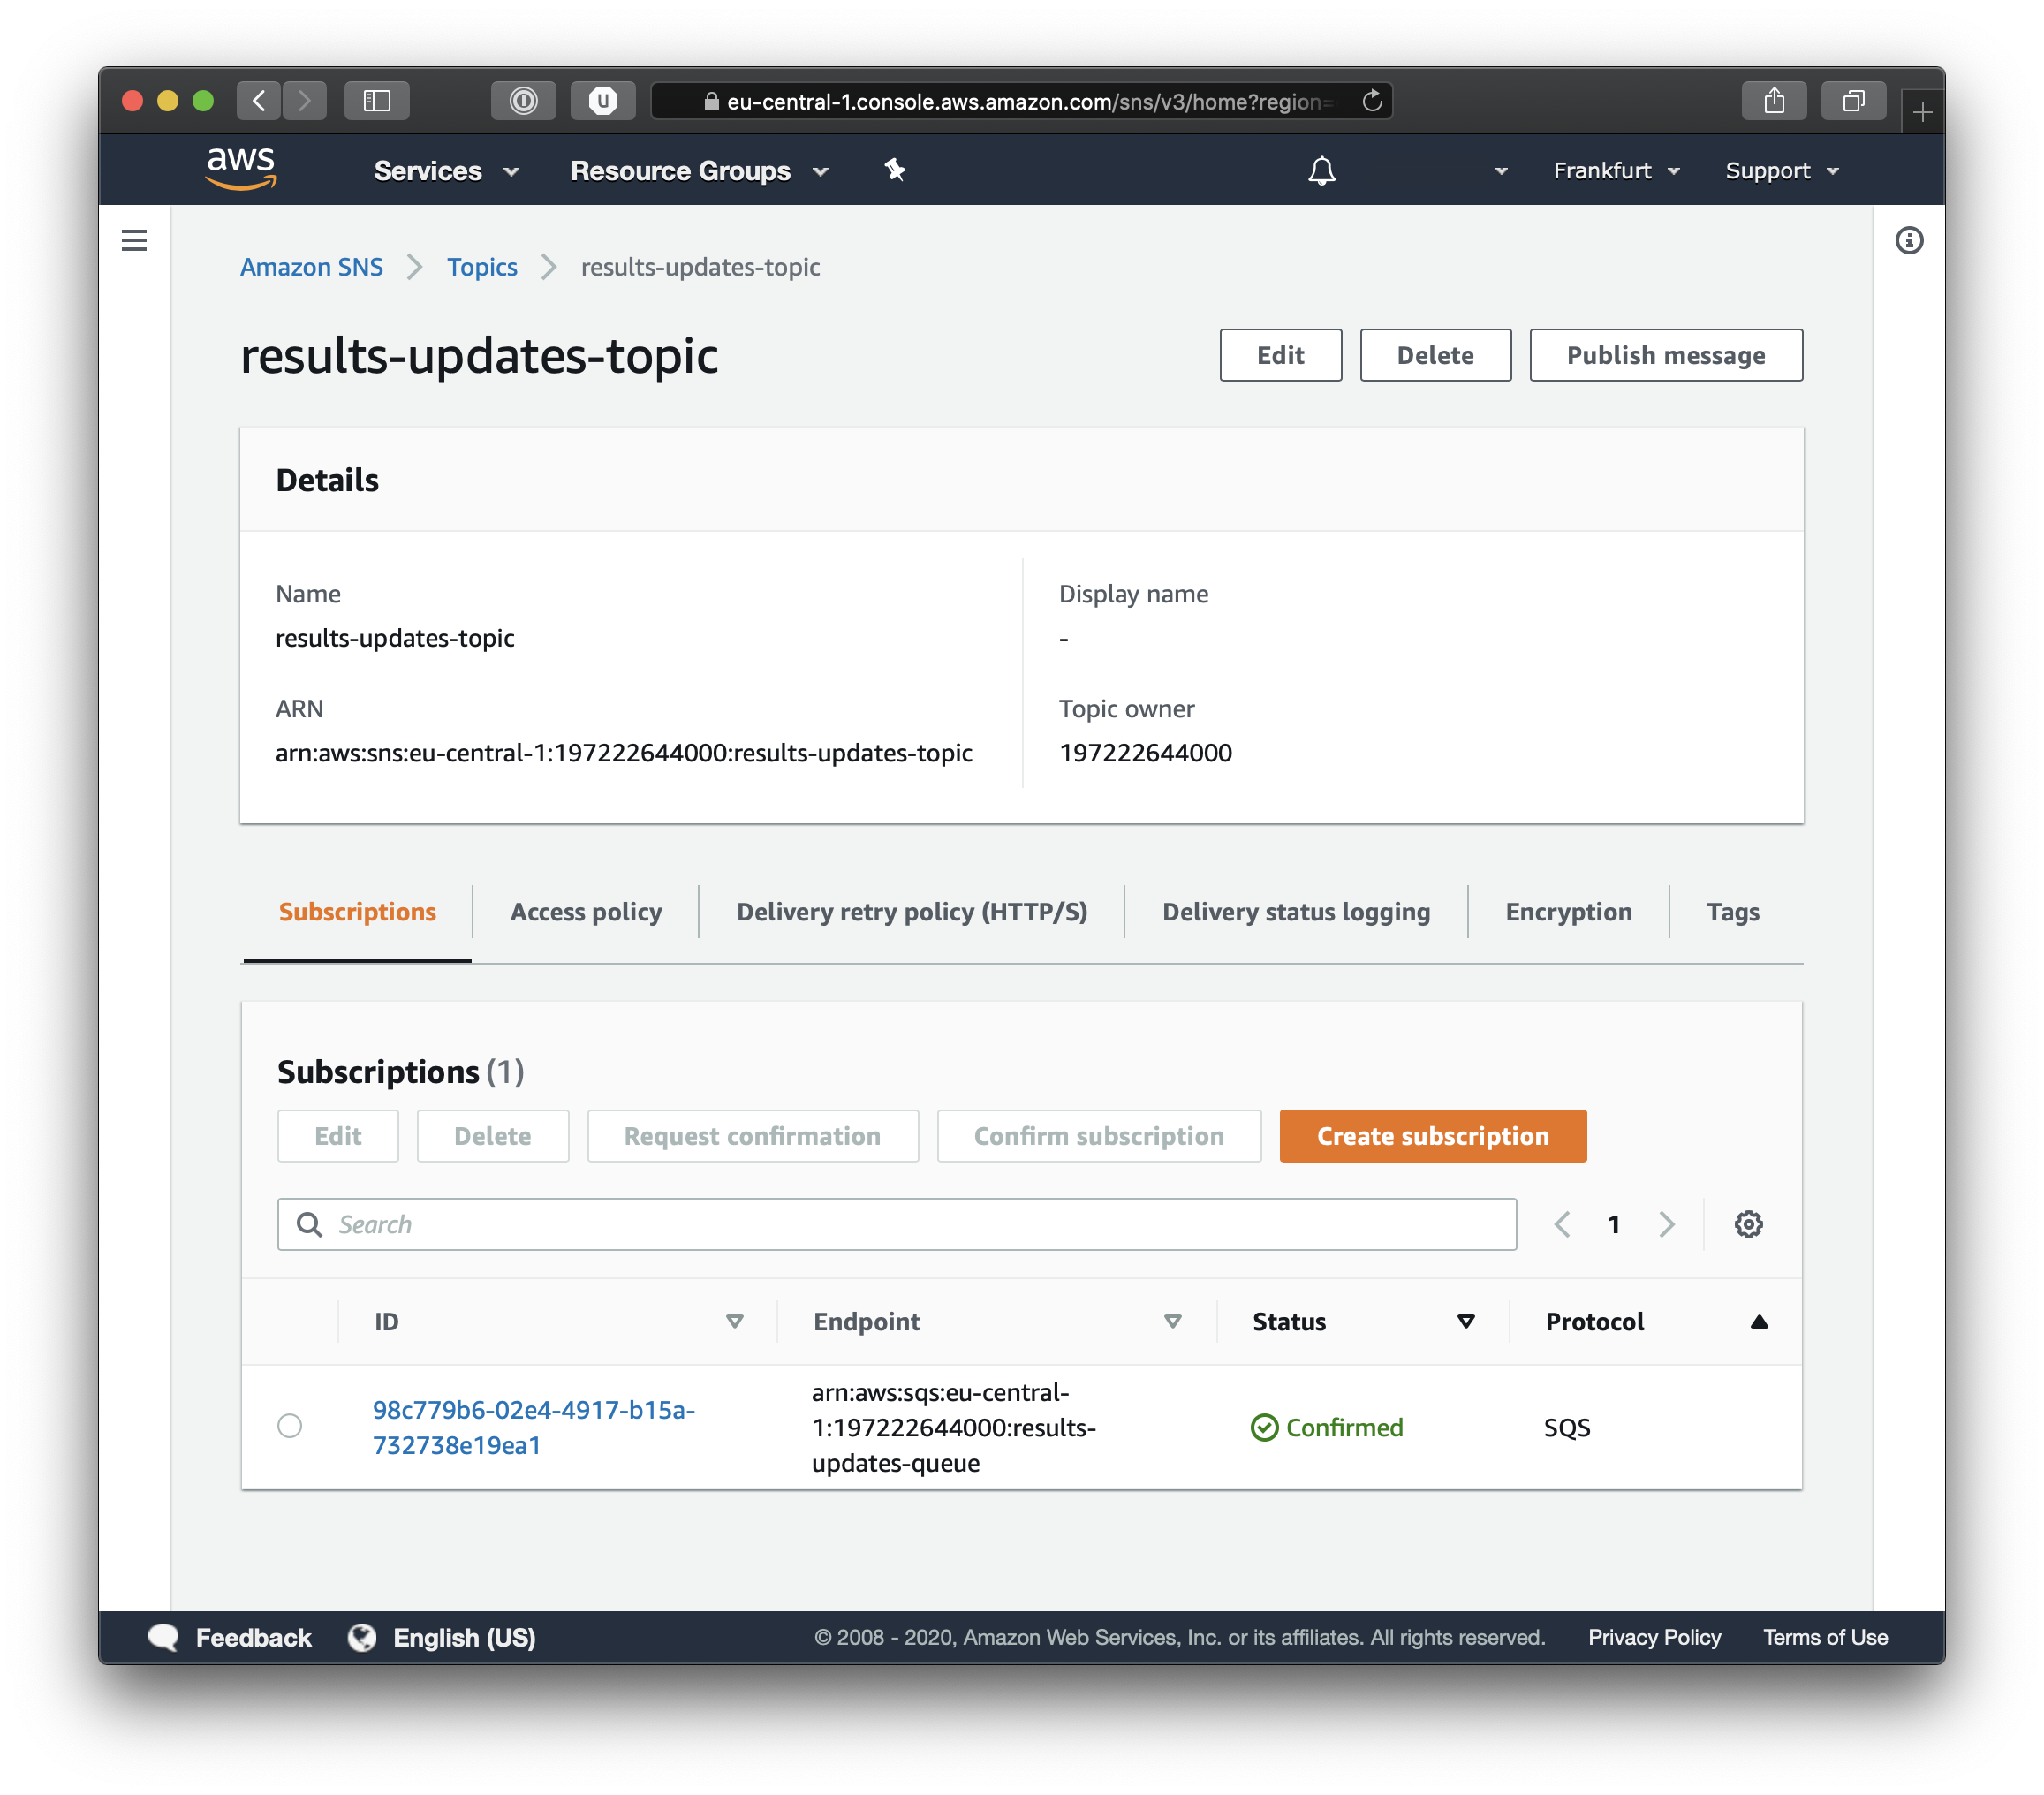
You can test your infrastructure simply by clicking on Publish Message and you will be able to send a test message.
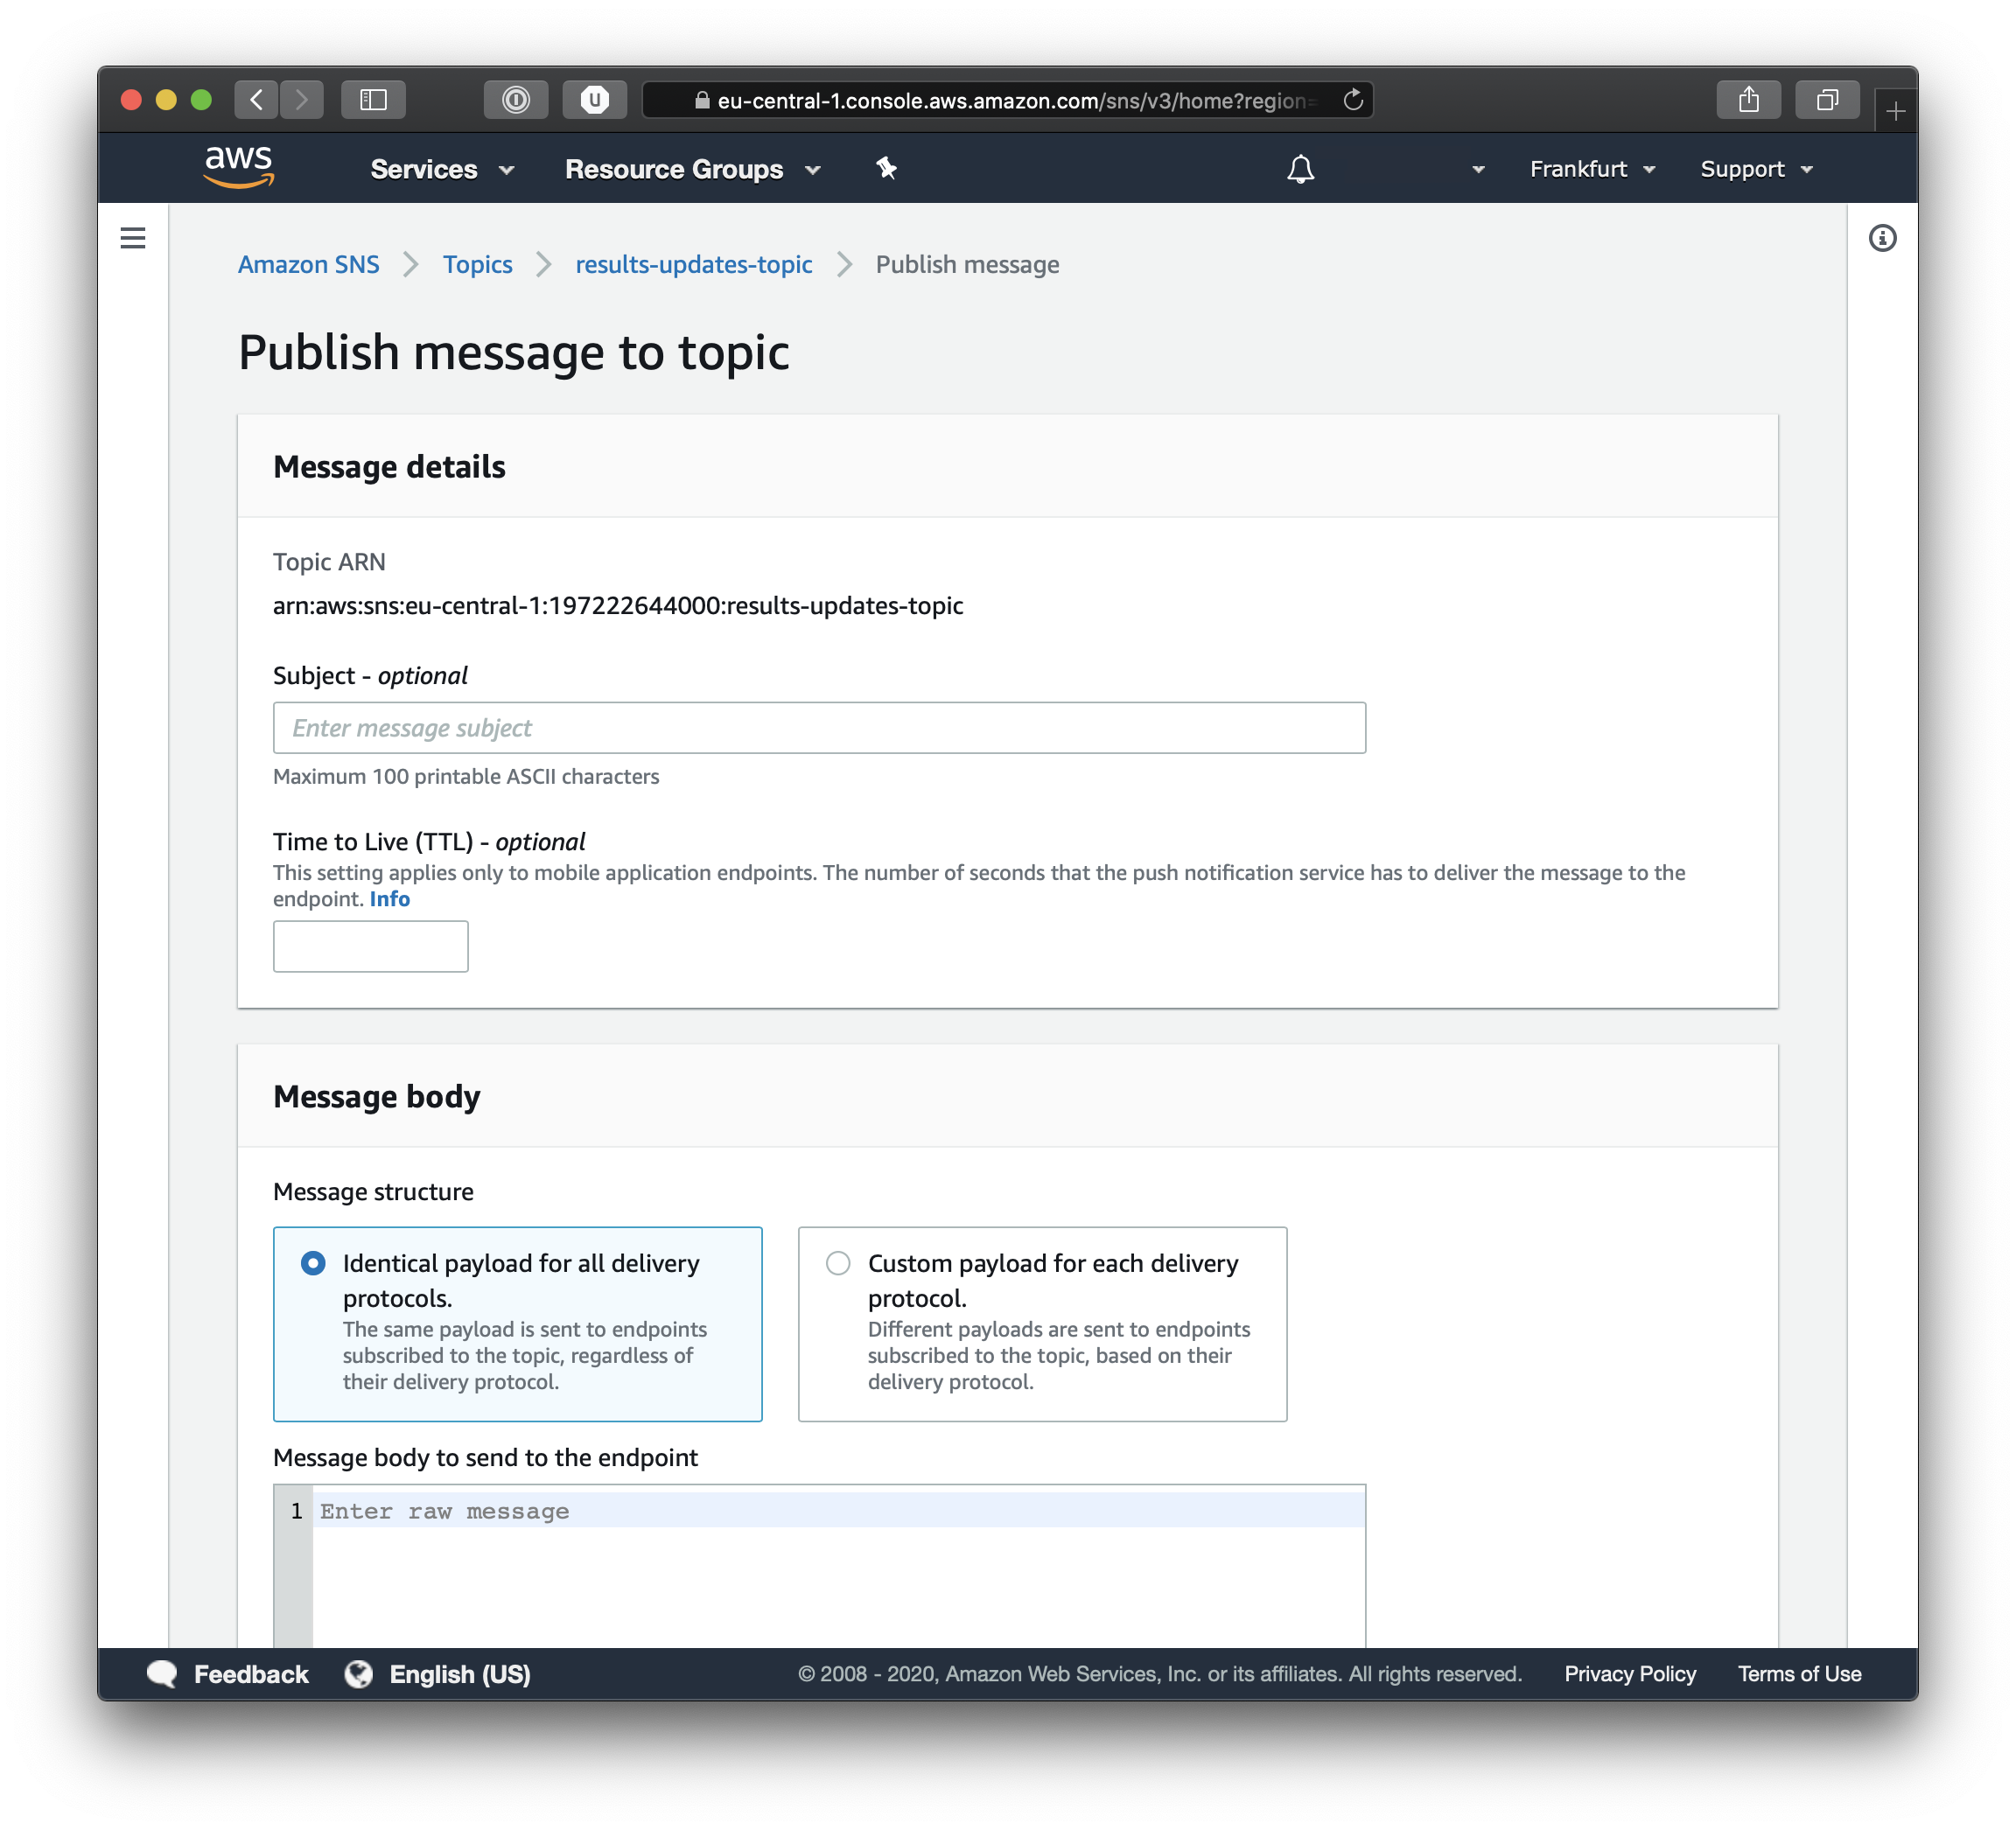
Insert a title and a message body and if you scroll down you will find the Publish Message button. Once you do that you can navigate to Simple Queue System and view the Queue and its contents. If you look closely at the screenshot below you will see the details of the queue and under the permissions tab you can see that the queue is subscribed to the results-updates-topic.
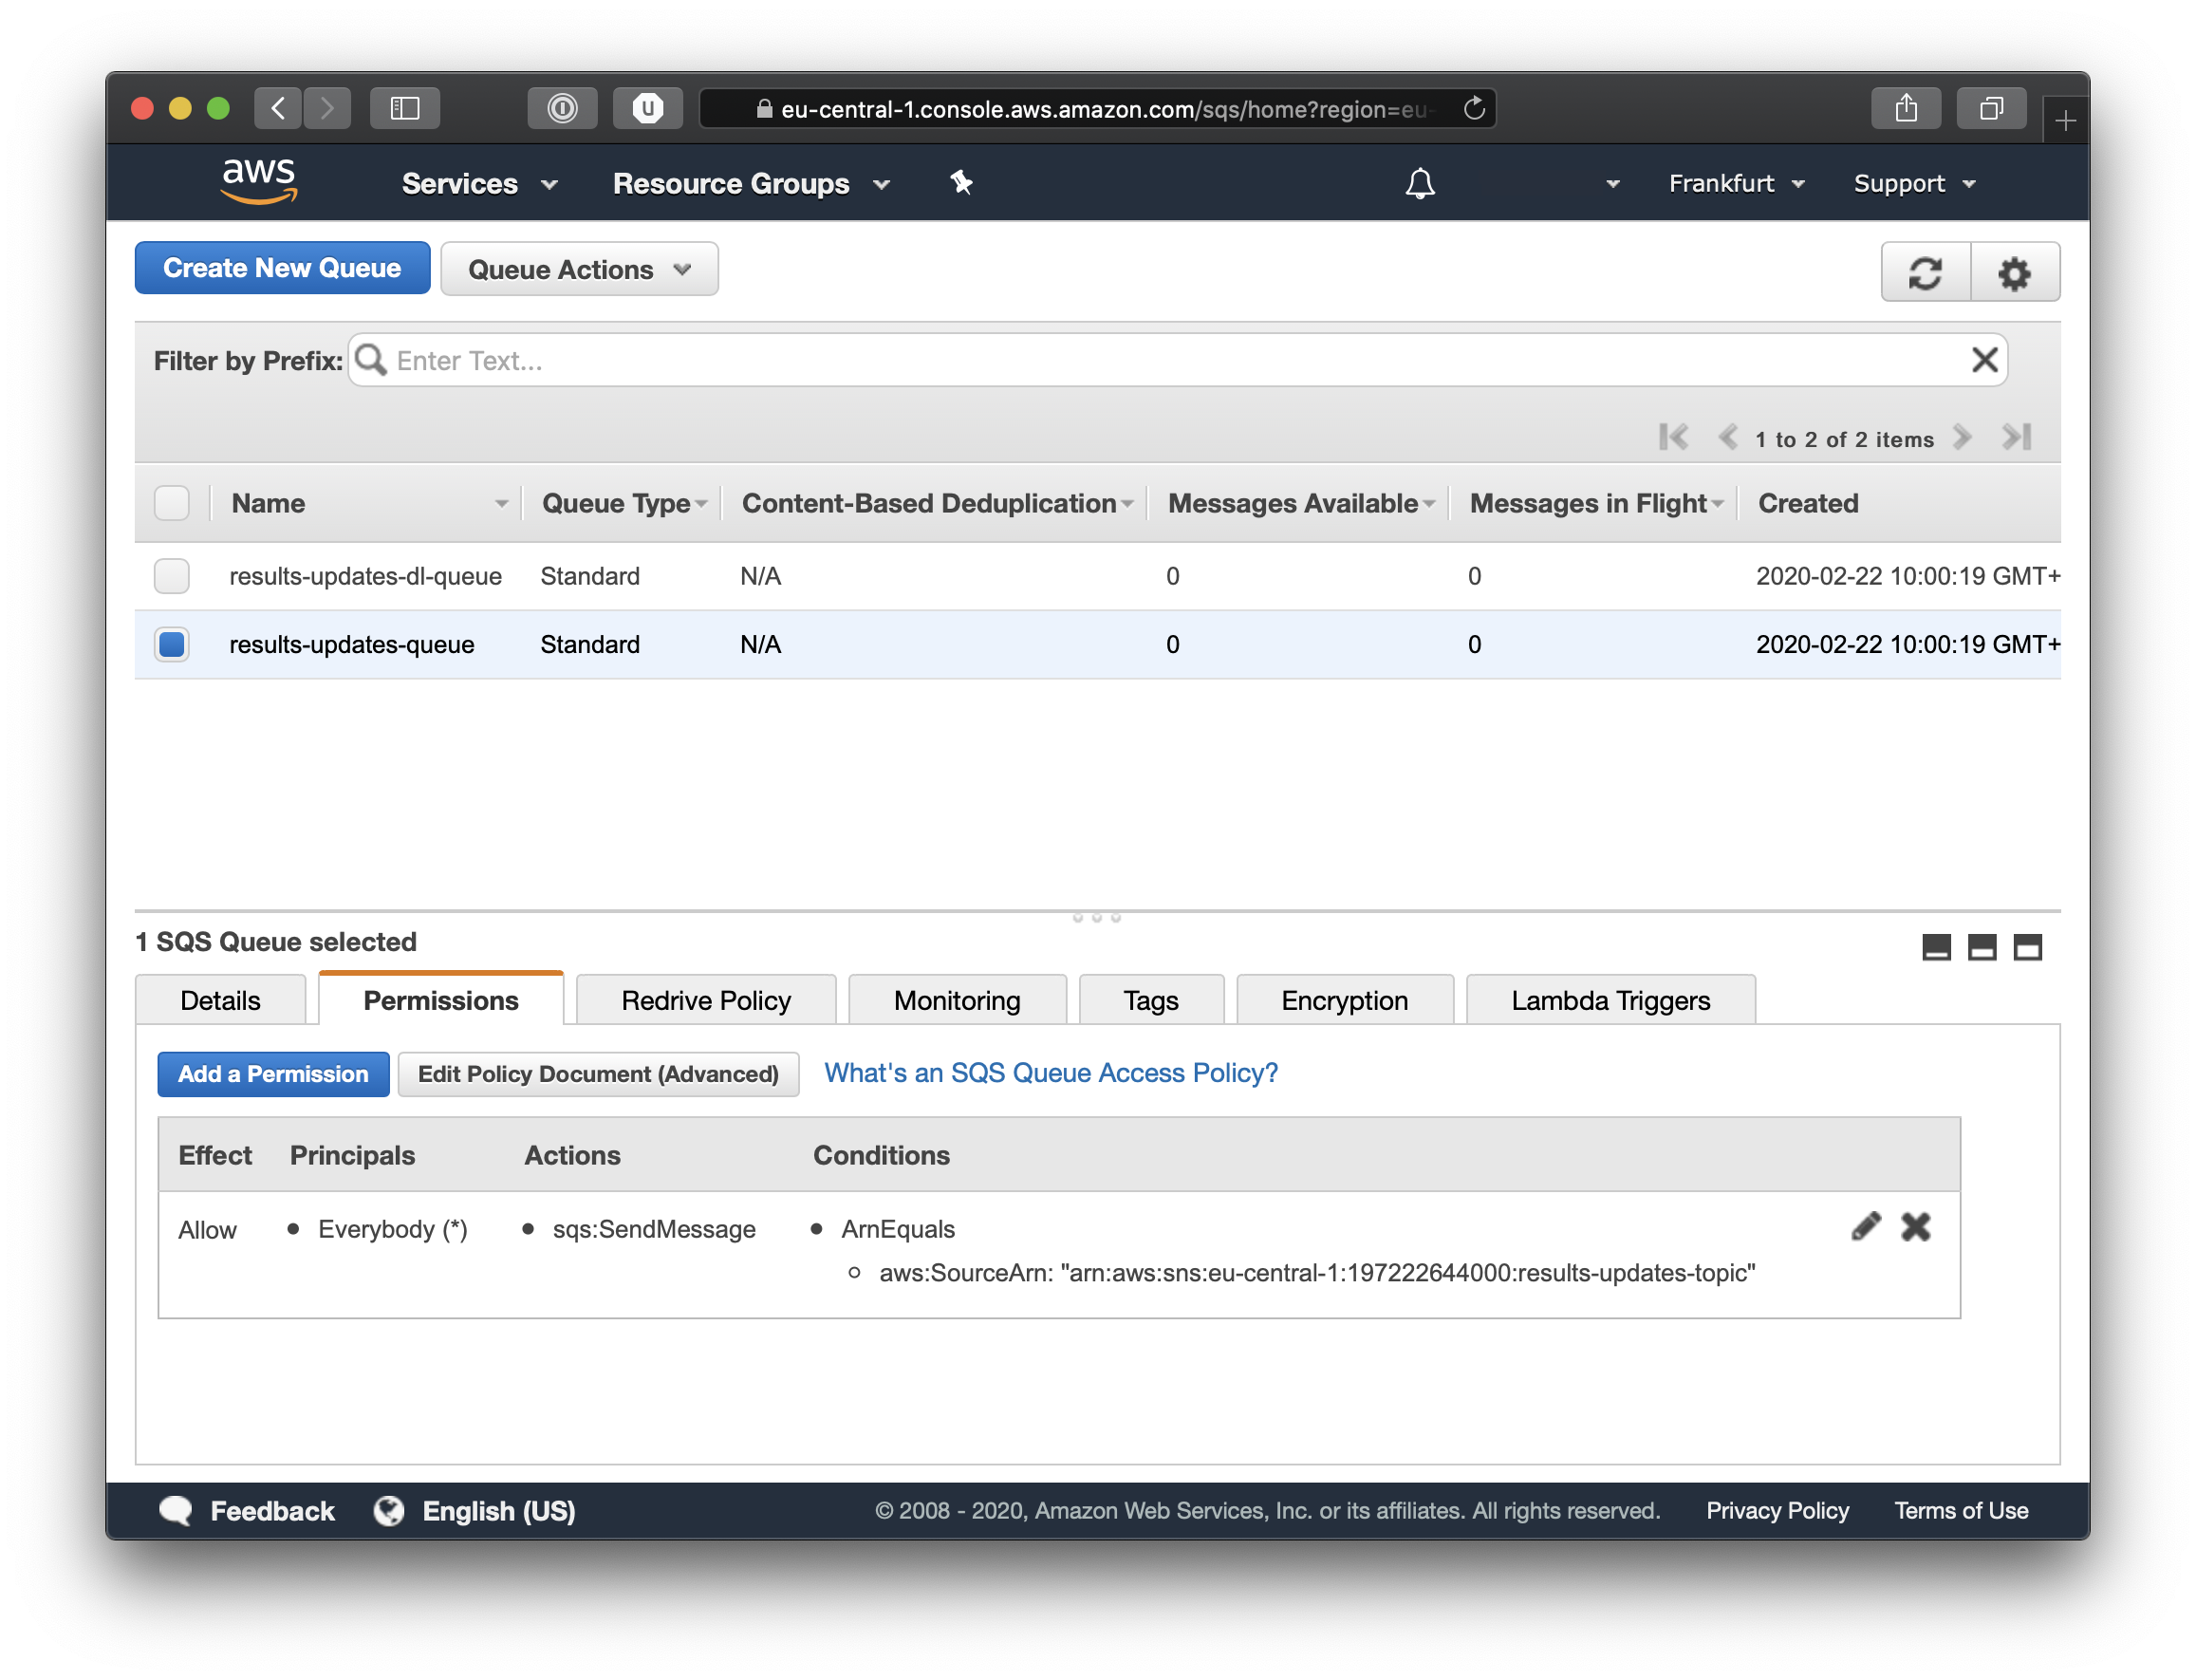
This is great, in the AWS console we see exactly all the things we have created, just like we had planned.
Lambda
At this point we have a very simple Message Broker using AWS resources. Of course we cannot really do much with what we have, aside from having looked at Terraform but we have a base to build the next piece of our infrastructure.
If you are unsure what AWS Lambda is you should take a quick peek at this article, but basically Lambdas are nothing more that a function, that we define, which is executed on demand by the AWS infrastructure. All the resources needed to run our function are provisioned and brought online in response to certain events. One of these events is the presence of Messages in an SQS queue.
Lets start looking at the actual code for our lambda. And we can start with our sample function, which will be in javascript using NodeJS, but it could be in Python, Go, Java or any of the other languages supported by AWS Lambda framework.
Lets create a directory for our function.
$ mkdir lambda
$ cd lambda
Here we will create a single javascript file. The code below simply logs the incoming event and returns simple response. Please note the async keyword in the function declaration.
// example.js
exports.handler = async function (event, context) {
  console.log("EVENT\n" + JSON.stringify(event))
  return { success: true }
};
This code will be perfectly fine for the post and our little demo, but in a real world scenario you must decide if your function is an asynchronous function or not, if it is you can use return and throw to send a response or error to the runtime.
If your function is not asynchronous then you will need to use the callback provided by the framework. This is the third parameter in the handler function signature function(event, context, callback).
Terraform
Since we have already written our function we will also start with what we need to package the file for the Lambda to work. Basically we need to compress the file(s) so that Terraform can then deploy them correctly. We can do that by creating a new file called data.tf in the root of the project. This will contain the Terraform archive resource.
# data.tf
data "archive_file" "lambda_zip" {
  type        = "zip"
  source_file = "${path.module}/lambda/example.js"
  output_path = "${path.module}/lambda/example.zip"
}
Now back to our AWS resources, where we define our actual Lambda. The code below points to resources that we have not yet defined (we will do so in the next section). The most important thing for now is that we are referencing the archive file we created, including the source_code_hash property.
# resources.tf
resource "aws_lambda_function" "results_updates_lambda" {
    filename         = "${path.module}/lambda/example.zip"
    function_name    = "hello_world_example"
    role             = "${aws_iam_role.lambda_role.arn}"
    handler          = "example.handler"
    source_code_hash = "${data.archive_file.lambda_zip.output_base64sha256}"
    runtime          = "nodejs12.x"
}
The role property found in the snippet above is the next step, this role informs AWS that our Lambda should take on the role of an actual Lambda function.
# resources.tf
resource "aws_iam_role" "lambda_role" {
    name = "LambdaRole"
    assume_role_policy = <<EOF
{
  "Version": "2012-10-17",
  "Statement": [
    {
        "Action": "sts:AssumeRole",
        "Effect": "Allow",
        "Principal": {
            "Service": "lambda.amazonaws.com"
        }
    }
  ]
}
EOF
}
The remaining terraform resources are all policies, and without this next policy our Lambda will not be able to consume messages from the SQS queue.
This policy sets the permissions for our lambda. See the role property below, and how it references our lambda role previously defined. Also the important part are the actions we specify ChangeMessageVisibility, DeleteMessage, GetQueueAttributes and ReceiveMessage.
# resources.tf
resource "aws_iam_role_policy" "lambda_role_sqs_policy" {
    name = "AllowSQSPermissions"
    role = "${aws_iam_role.lambda_role.id}"
    policy = <<EOF
{
  "Version": "2012-10-17",
  "Statement": [
    {
      "Action": [
        "sqs:ChangeMessageVisibility",
        "sqs:DeleteMessage",
        "sqs:GetQueueAttributes",
        "sqs:ReceiveMessage"
      ],
      "Effect": "Allow",
      "Resource": "*"
    }
  ]
}
EOF
}
The final policy is not strictly needed but it ensures that we are logging to Cloud Watch, this ensures traceability in our serverless infrastructure. We again reference the lambda role via the role property. And we set the following permissions CreateLogGroup, CreateLogStream and PutLogEvents. With this policy in place, every time we print a log message in our javascript handler we will be able to see it inside Cloud Watch.
# resources.tf
resource "aws_iam_role_policy" "lambda_role_logs_policy" {
    name = "LambdaRolePolicy"
    role = "${aws_iam_role.lambda_role.id}"
    policy = <<EOF
{
  "Version": "2012-10-17",
  "Statement": [
    {
      "Action": [
        "logs:CreateLogGroup",
        "logs:CreateLogStream",
        "logs:PutLogEvents"
      ],
      "Effect": "Allow",
      "Resource": "*"
    }
  ]
}
EOF
}
Now all that is left for us to do it run the Terraform command which we saw earlier. So lets to that, but there is no need to run init again, at least not now.
$ terraform plan -var-file="vars.tfvars"
All should go well, you should not see any errors. This way we are able to incrementally update our infrastructure. This is one of the many strengths of Terraform. Lets go ahead and apply our changes.
$ terraform apply -var-file="vars.tfvars"
AWS (take 2)
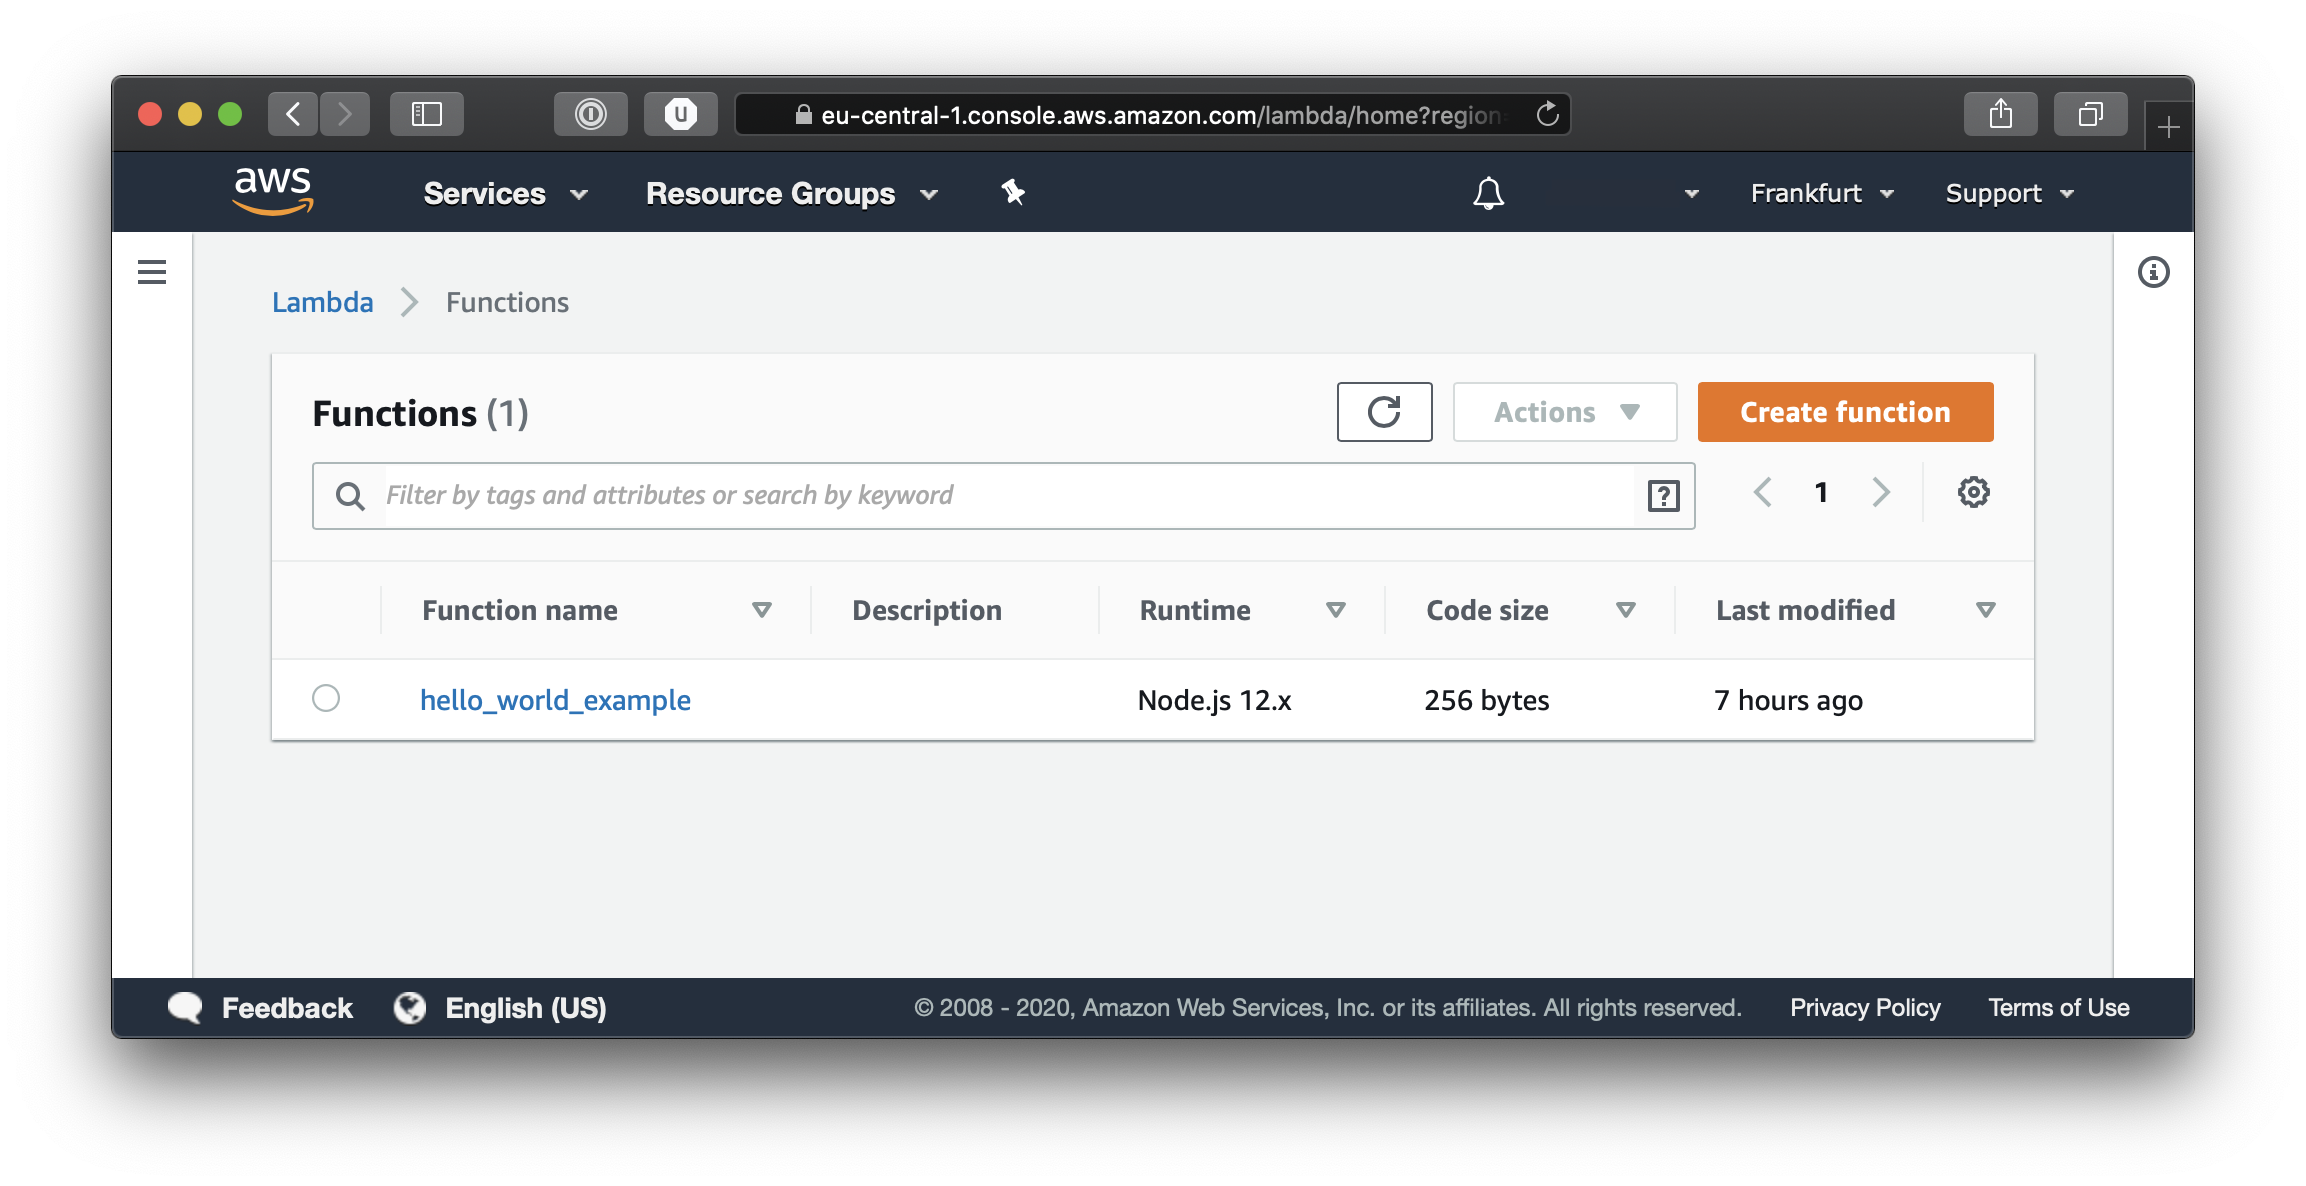
Lets take a look at our AWS console and see what our Terraform script has done. Log on to the AWS console and select Lambda from the Services menu. Here you will be able to see the new function which we created.
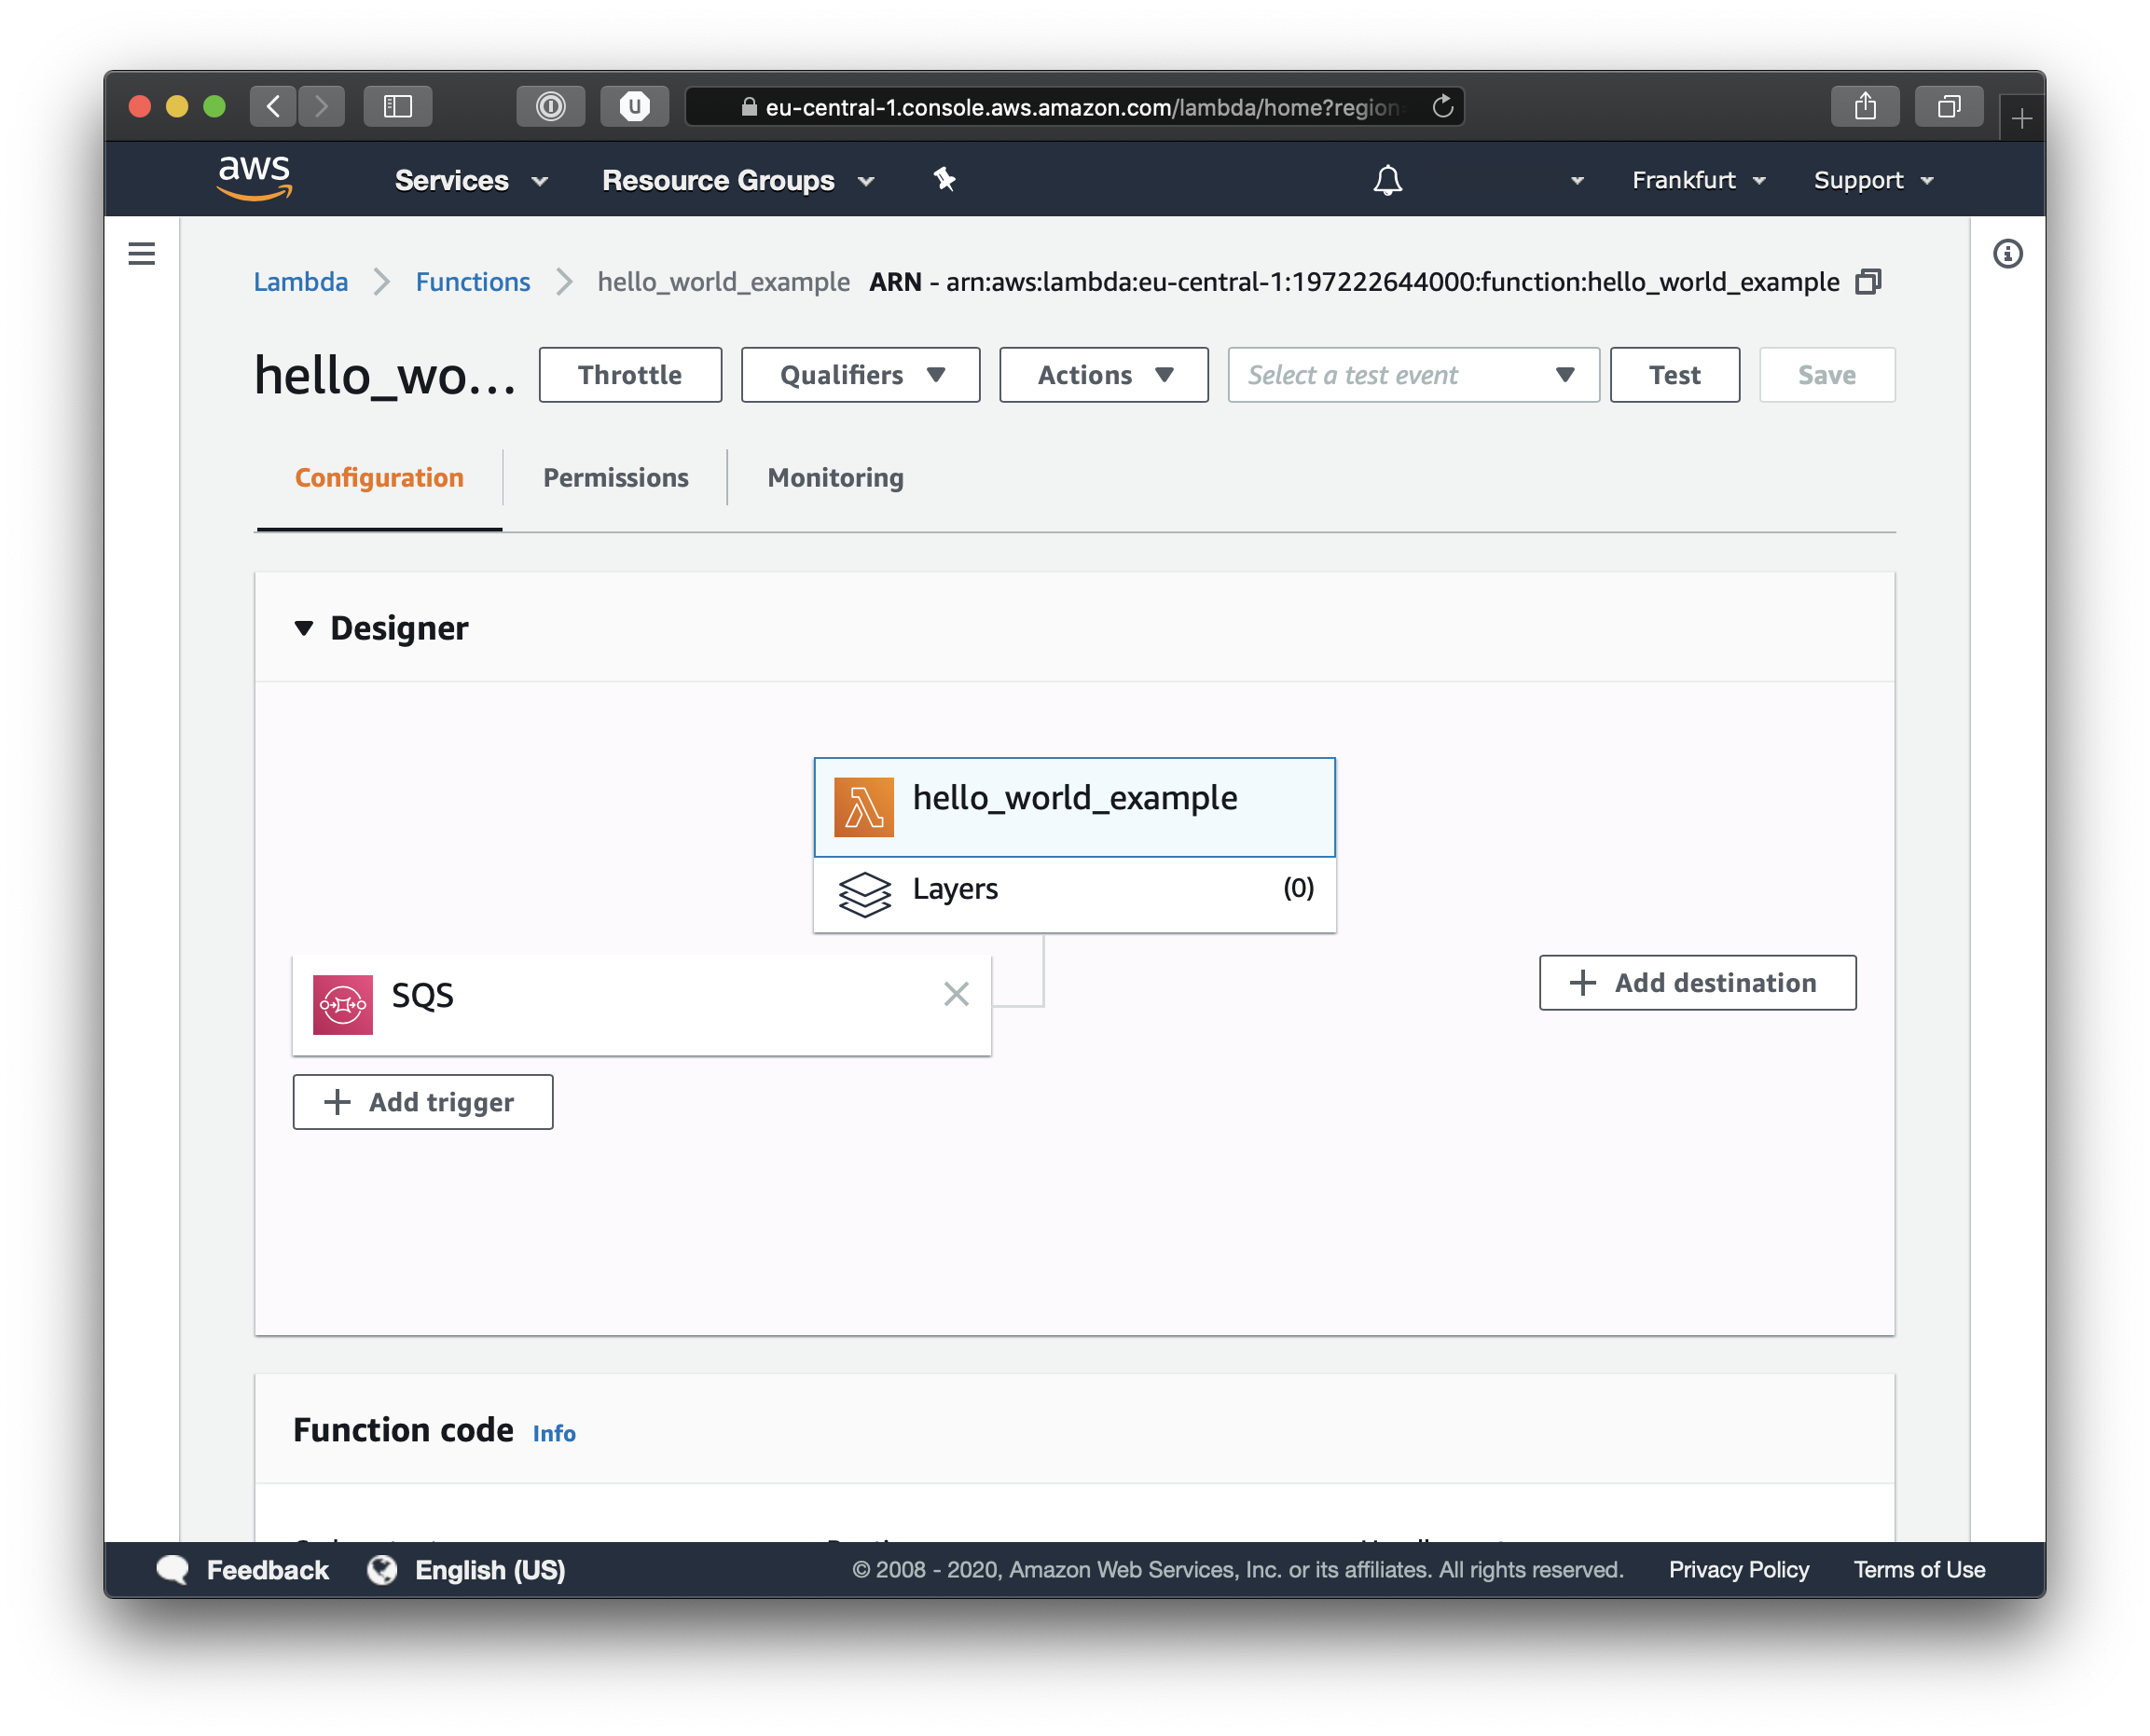
Now simply click on the function name and you will be able to see the configuration settings for our function. Feel free to browse around in the various tabs to get acquainted with the AWS Lambda details page.
Now we can test the entire flow, and if you go back to the SNS topic details, you can again click on the Publish Message button and try again to send a test message. This time though we will be able to see the events and the log output in Cloud Watch. From the Services menu, select CloudWatch and you should see something like this when you click on LogGroups.
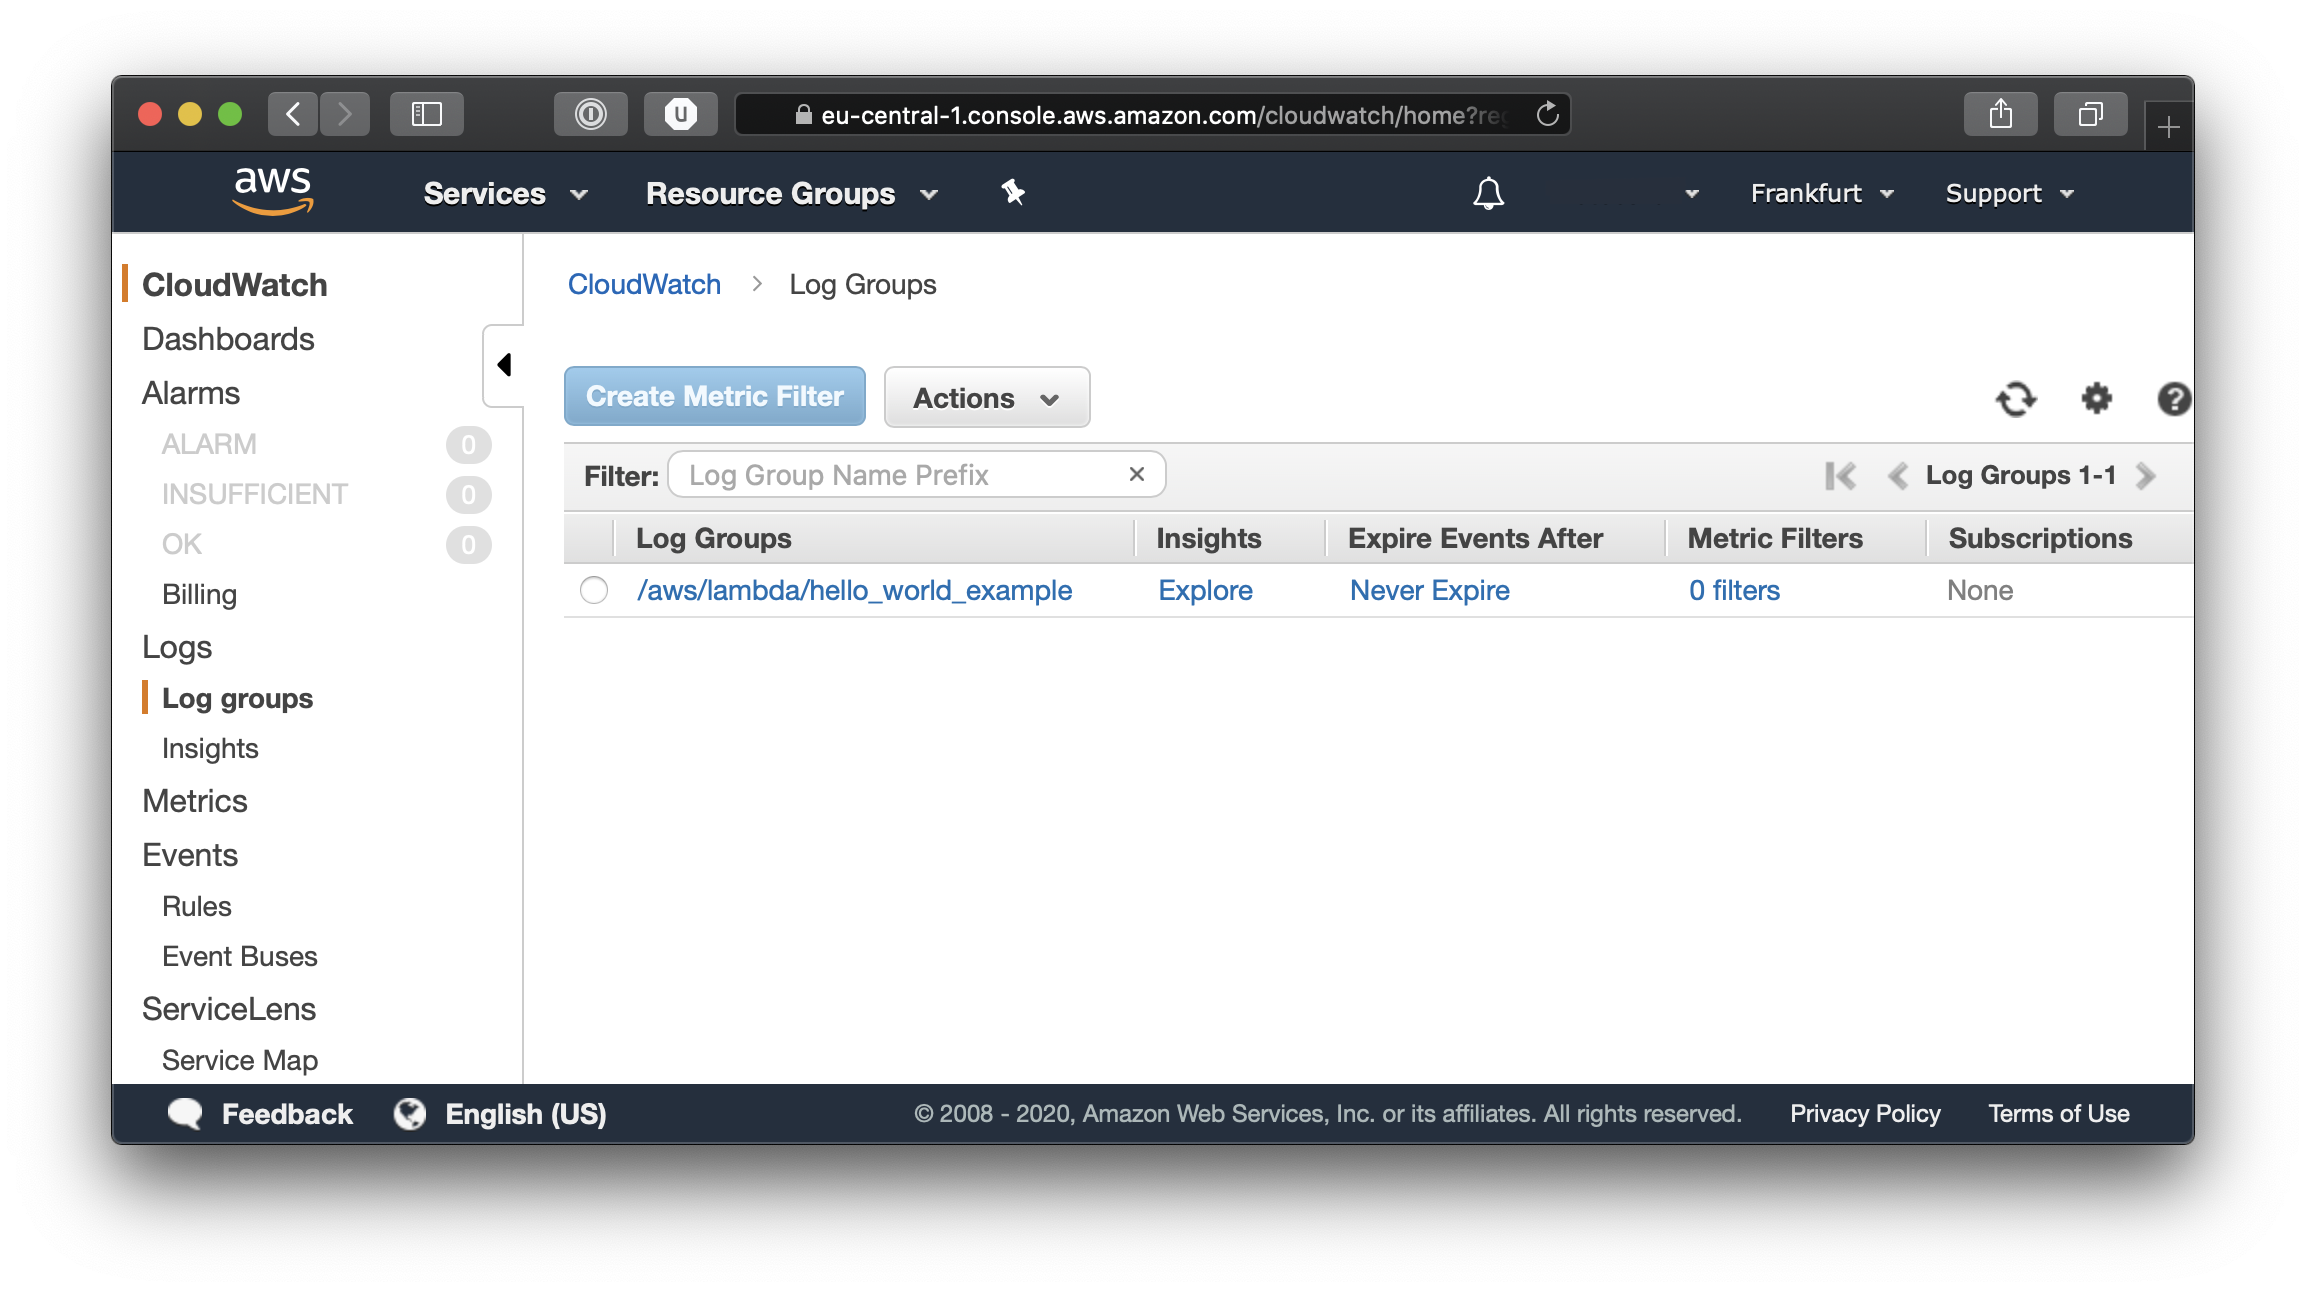
Click on our function’s log group to see the different events and logged messages.
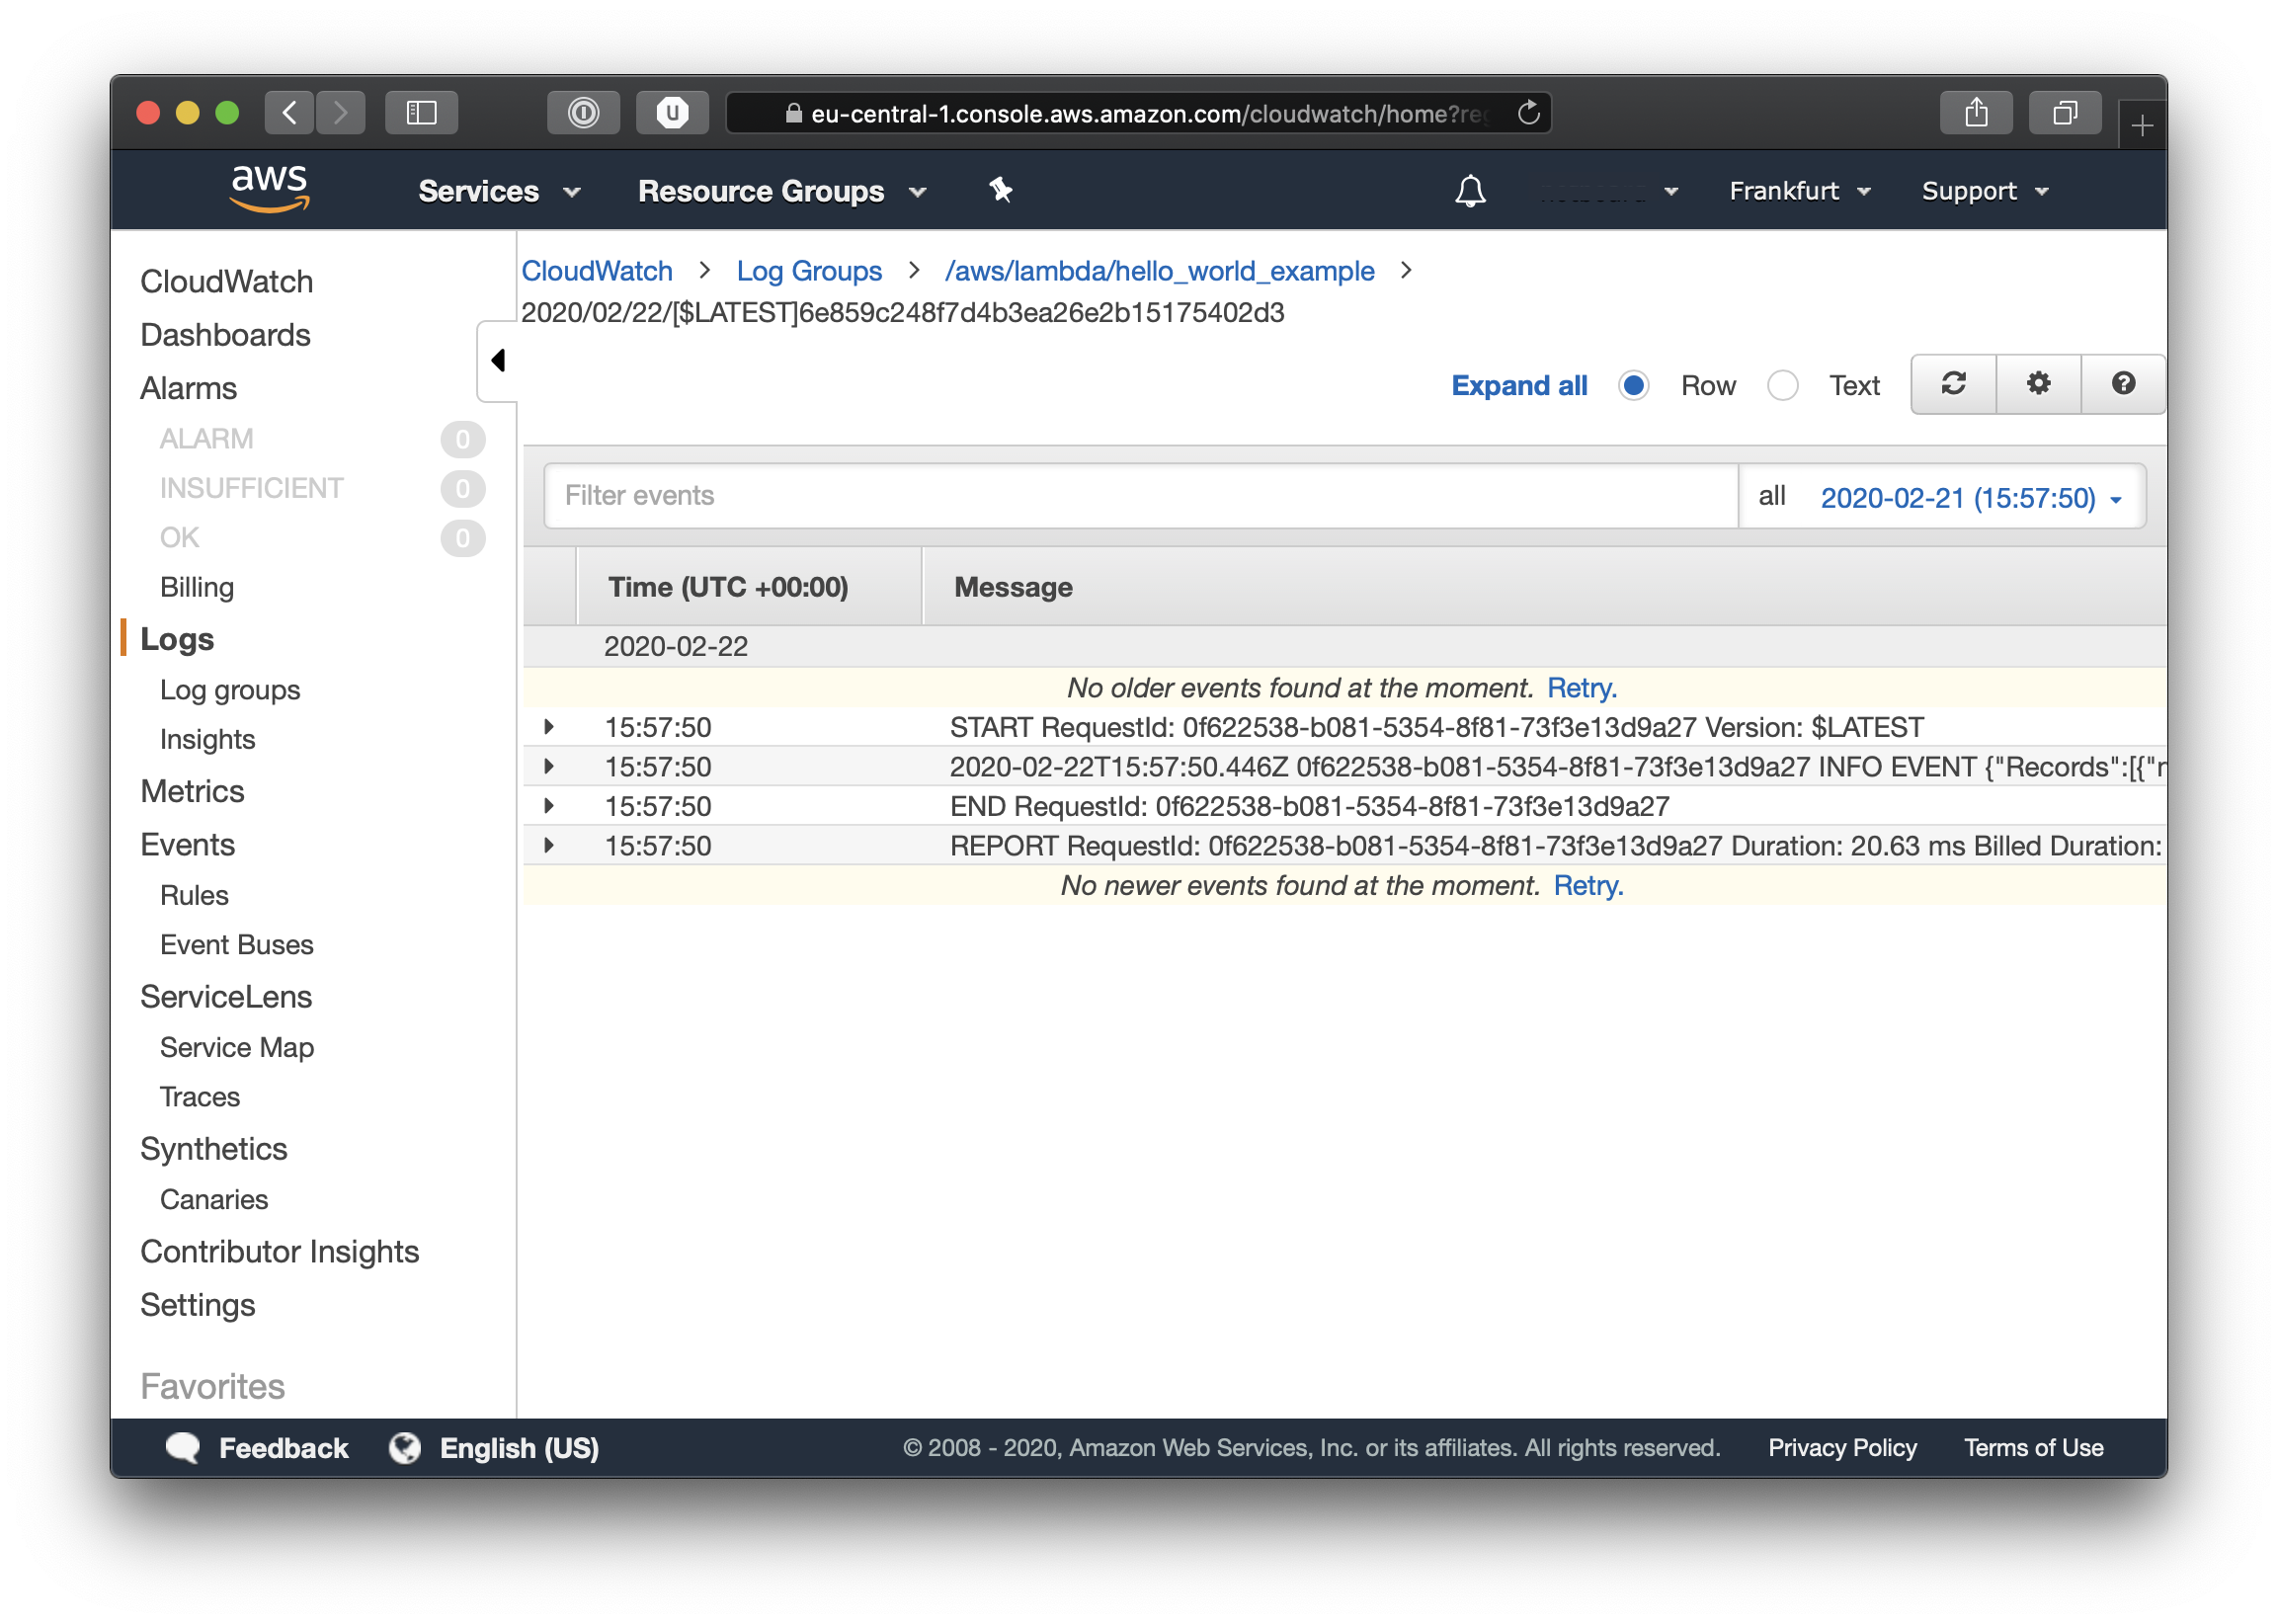
As you can see our infrastructure is working, our Message Broker is doing exactly what it should and now all that is missing is the business logic for the Lambda, which I will leave to you the reader to complete. If you expand the INFO EVENT line you will be able to see all that our Lambda function has logged, including our sample log message. Also in the logs you will see all kinds of different metrics, including duration time and billed time.
Final Notes
I would just like to make a small final personal note regarding Infrastructure as Code (IaC). After so many years doing software I cringe at the thought of having to run commands manually to provision my infrastructure, I find the process very error prone and difficult to reproduce, especially when things go sour and it’s the middle of the night. Thus IaC is in my opinion one of the best practices for software developers when doing infrastructure.
Not doing IaC is like not using source control for your code, it’s just a no no. I don’t care if the code is a one off script or a PoC that will get trashed after a week. If you write code, you use source control. If you do infrastructure you do IaC. There is no other way.
If you don’t believe me I suggest you take a look at this article about all the benefits of IaC.
Also should you like to dig deeper into Lambda’s you might want to read this documentation.
See Also
-
Custom events in Hapi
Create, raise and handle custom events in Hapi using plugins -
Bearer strategy in Express.js
How to use Bearer strategy with Express.js using Passport.js -
Check if a value is an array in JavaScript
How can you check if a value is an array in JavaScript